In Firefox, type ‘about:config’ in the address bar
If prompted, accept any warnings
search for ‘security.enterprise_roots.enabled‘ as the Name
Set the value to ‘true’
Configuring Firefox to use the Windows Certificate Store
Leave a reply
In Firefox, type ‘about:config’ in the address bar
If prompted, accept any warnings
search for ‘security.enterprise_roots.enabled‘ as the Name
Set the value to ‘true’
When we publish a website URL via Citrix, we always to lockdown the website user can access.
The easiest way is to use IE lock down mode. To enable lock down mode is simple, you only need to add “-p” parameter.
For example,
iexplorer -k http://wwww.google.com
Then when user start the application, they will get a full screen IE with no addressbar, no bottons.
But please be aware that, in lock down mode there is no exit botton, so User need to press ALT+F4 to close IE.
Is there any better option?
Yes, you can use below script:
Set objArgs = WScript.Arguments
If objArgs.Count = 0 Then
WScript.Echo "No URL provided, please supply a URL to open" & VbCrLf & VbCrLf & "e.g. CScript OpenURL.vbs http://www.google.com"
wscript.quit
End If

Set objIE = CreateObject("InternetExplorer.Application")

With CreateObject("internetexplorer.application")
   .navigate "about:blank"
   With .document.parentWindow.screen
     iHeight = .height
     iWidth = .width
   End With
End With

objIE.StatusBar = False
objIE.Visible = True
objIE.AddressBar = False
objIE.MenuBar = False
objIE.ToolBar = False
objIE.Top = 0
objIE.Left = 0 + 8 'Move to the side just a bit to show the desktop
objIE.Width = iWidth - 16 'Shrink to let a bit of the desktop show on the sides
objIE.Height = iHeight - 28 'Shrink a bit to see the taskbar
objIE.Navigate (objArgs(0))
Then publish “IE.vba www.google.com”
I’m still using Windows 2012R2 as my home lab’s domain controller. Since MS released Windows Server 2019, so I think it’s the time to upgrade my test lab to Windows Server 2019.
The first server I want to upgrade is my domain controller.
Even though you can mount the ISO and click setup.exe to upgrade Domain Controller to Windows 2016/2019, but after a test, I found that this kind of “upgrade” is a fresh installation…If you upgrade your DC in this way, you will find after reboot, your DC is gone…You will only have a standalone server running windows 2016/2019 which is in a workgroup… I don’t know why MS permit people doing “upgrade” in this way and don’t show any warning message at all…
So how to upgrade DC to Windows 2016/2019 in the right way?
The right way is to build a new server, and prompt it to domain controller, and then move all FSMO roles to it.
1. Install a new Windows 2016/2019 Server.
2. Install “Active Directory Domain Services” on the server
3. Promote the server to a domain controller. Make sure you also installed DNS services on it.
4. Reboot the server.
5. Once the serer is up and running. Open Server Manager, then open “Active Directory Module for Windows PowerShell”
6. Run below command:
Move-ADDirectoryServerOperationMasterRole -Identity "DC2019" -OperationMasterRole 0,1,2,3,4
Press Y to move all FSMO roles to this server.
7. Run below command to make sure all FSMO roles are migrated to the new domain controller
Get-ADDomain
Get-ADForest
8. demote the old domain controller and then remove the old DC from domain. And then shut down the old DC
9. Change the new DC IP address to the Old one. Then run below command to make sure all DNS records are updated and also no error.
ipconfig/registerdns
dcdiag /fix
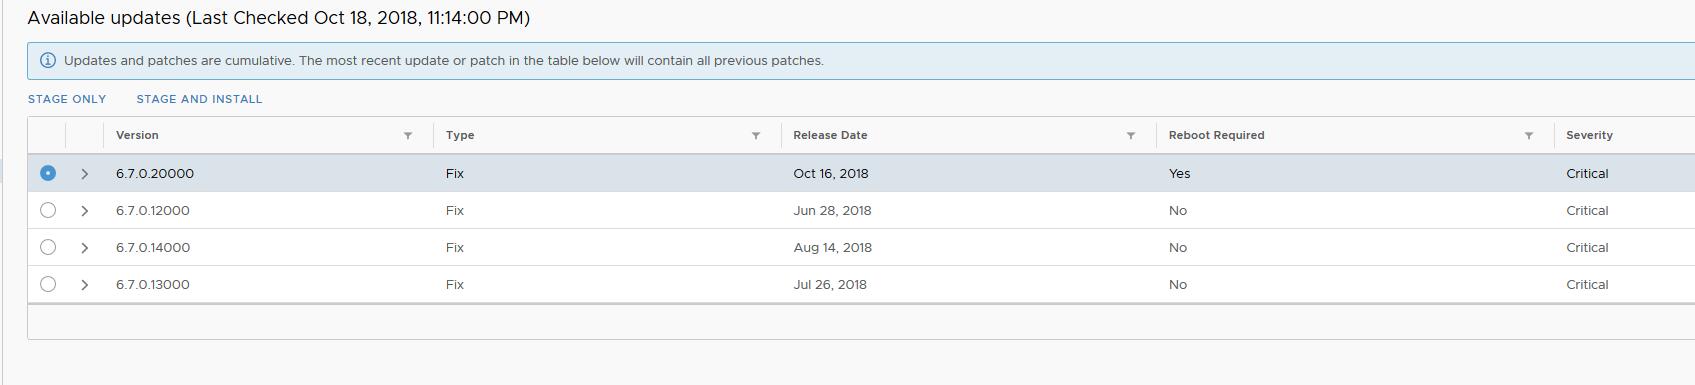
It seems there is a bug in vCenter 6.7 which caused the update check of VCSA is not working.
So to upgrade VCSA from 6.7 to 6.7u1, you need to
1. In the vCenter Server Appliance Management Interface, go to Update > Settings and configure the custom URL to https://vapp-updates.vmware.com/vai-catalog/valm/vmw/8d167796-34d5-4899-be0a-6daade4005a3/6.7.0.10000.latest/.
2.Re-try the upgrade.
Then you should be able to see all the patches.
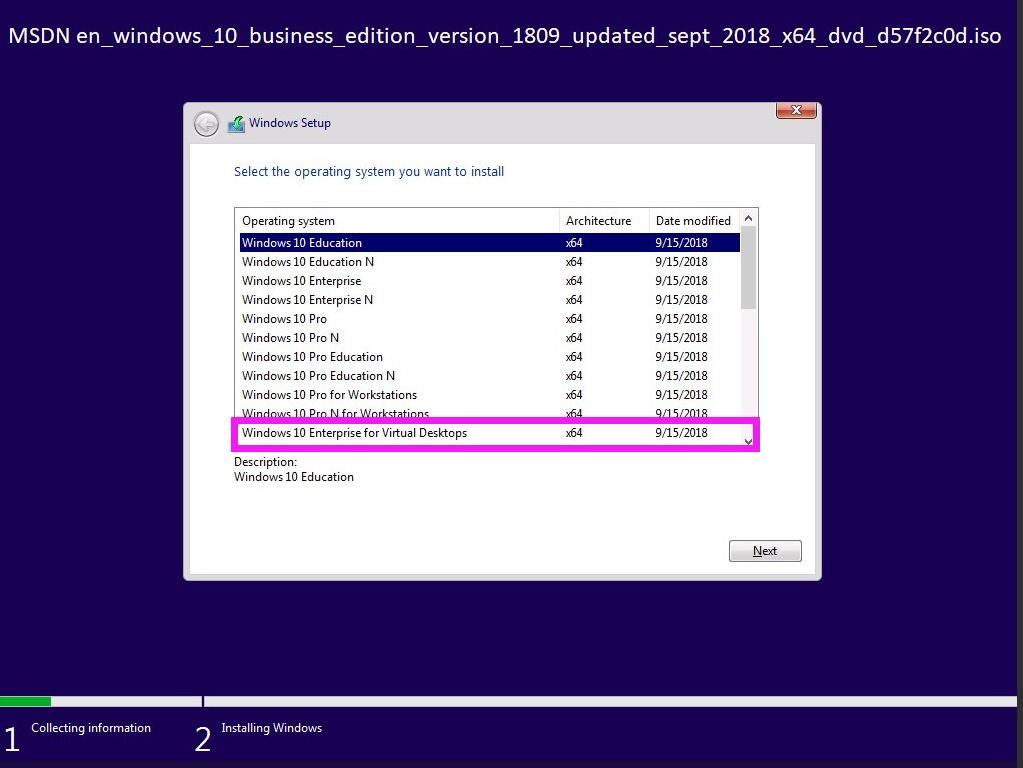
It seems for this version of Windows 10, multiple users can login at the same time.
I believe this version is the one used by Windows Virtual Desktop on Azure.
Microsoft released Office 2019 yesterday. But it seems Microsoft push very hard to get people move from traditional office to office 365.
After I login Microsoft Volume Licensing Service Center, I found that Microsoft stopped to provide the ISO for Office Professional Plus 2019. And Microsoft only provides the deployment tool to deploy office 2019.
Office Professional Plus 2019 will be released with Click-to-Run installation technology only. We are not providing MSI as a deployment methodology for Office Professional Plus 2019.
Ok, then how can we install Office Professional Plus 2019?
First of all, download Office_Deployment_Tools_2019_MLF_X21-88134.exe from Microsoft website.
Then create an xml file as following:
<Configuration>
  <Add OfficeClientEdition="64" Channel="PerpetualVL2019">
	<Product ID="ProPlus2019Volume" PIDKEY="#####-#####-#####-#####-#####" >
		<Language ID="en-us" />
		<ExcludeApp ID="Access" />
		<ExcludeApp ID="Publisher" />
		<ExcludeApp ID="Groove" />
		<ExcludeApp ID="Lync" />
		<ExcludeApp ID="OneDrive" />
	</Product>
  </Add>
</Configuration>
Please be aware “ProPlus2019Volume” is the only available channel for office 2019 “ProPlus2019Volume”.
3. Run below command to get office 2019 installed
setup /configure configuration.xml
And you can also download a copy of the installation files if you want via below command:
setup /download configuration.xml