Command:
powercfg -requests
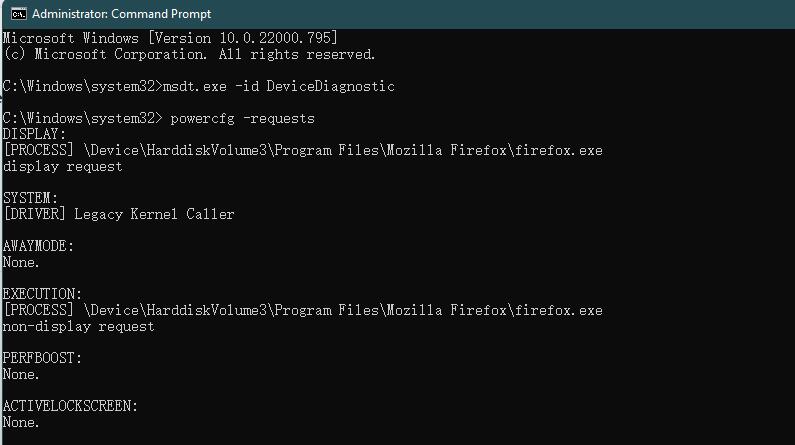
Command:
powercfg -requests
I just purchased a Dell OLED monitor AW3423DW, and I was thinking finally I can enjoy Netflix 4K on my computer not. But, things are not easy, Netflix can only play content content in HD (1080p). And I did some research and finally got Netflix working with 4K HDR.
Here are the steps you need to do:
1. Check your Graphics cards to make sure it supports HDCP 2.2, which means the video card need to have HDMI 2.0 or DisplayPort 1.4 or higher. I’m using old Nvidia GTX980, so I can only play Netflix with 1080p…. So Upgraded it to Nvidia RTX3070.
2. Enable HDR and Enable “Play streaming HDR video” in Windows Display settings.
3. Purchase and install HEVC Video Extensions from Microsoft Store.
4. Enable “Hardware Acceleration” in Edge via Settings – System and Performance – Use Hardware Acceleration. Only Edge or Chrome can play Netflix in 4K, Firefox or Netflix App can only stream 1080p content on windows.
5. Enter edge://flags in the URL bar and open, Find PlayReady DRM for Windows 10/11 and select Enable. Then restart Edge.
For now you should be able to watch Youtube HDR content. But to watch Netflix in 4K, there is one more step…
6. If you have multiple monitors, you need to turn off any monitor not support HDCP 2.2. For example, my old Dell UP2716d monitor only has Display port 1.2 and HDMI 1.4 which both are not support HDCP 2.2. I need to turn the off before I start Edge, otherwise Netflix will only stream in 1080p.
After complete above steps, in Edge go to edge://gpu, and search for HDCP 2.2, you should be able to see it’s shown as true.
Once you completed all these steps, use Edge to open Netflix, and search a video, for example, Stranger Things, you should be able to see HDR logo. Once you start streaming it, press CRTL+ALT+SHIFT+S, then you should be able to see video resolution is 3440*1440. If you still see 1920*1080, then it means your video is still in 1080p.
Today when I tried to upgrade my windows 10 1909 to windows 10 20H1, I got multiple BSOD.
Based on the information on the BSOD screen, the BSOD were caused by some drivers (aksdf.sys, hardlock.sys, aksfridge.sys)

 )
)
After investigation, looks like all these drivers were Sentinel Data Filter Device Driver/Aladdin HASP Data Filter Device Driver, Which provided by Safenet.
I have no idea how these driver got installed into my computer, and I can’t remove them from control panel.
The fix is to download the Sentinel HASP/LDK Windows GUI Run-time Sentinel HASP/LDK Windows GUI Run-time from thalesgroup website
Install, then uninstall it, reboot.
After reboot, I can upgrade to windows 10 20H1 successfully.
I’m still using Windows 2012R2 as my home lab’s domain controller. Since MS released Windows Server 2019, so I think it’s the time to upgrade my test lab to Windows Server 2019.
The first server I want to upgrade is my domain controller.
Even though you can mount the ISO and click setup.exe to upgrade Domain Controller to Windows 2016/2019, but after a test, I found that this kind of “upgrade” is a fresh installation…If you upgrade your DC in this way, you will find after reboot, your DC is gone…You will only have a standalone server running windows 2016/2019 which is in a workgroup… I don’t know why MS permit people doing “upgrade” in this way and don’t show any warning message at all…
So how to upgrade DC to Windows 2016/2019 in the right way?
The right way is to build a new server, and prompt it to domain controller, and then move all FSMO roles to it.
1. Install a new Windows 2016/2019 Server.
2. Install “Active Directory Domain Services” on the server
3. Promote the server to a domain controller. Make sure you also installed DNS services on it.
4. Reboot the server.
5. Once the serer is up and running. Open Server Manager, then open “Active Directory Module for Windows PowerShell”
6. Run below command:
Move-ADDirectoryServerOperationMasterRole -Identity "DC2019" -OperationMasterRole 0,1,2,3,4
Press Y to move all FSMO roles to this server.
7. Run below command to make sure all FSMO roles are migrated to the new domain controller
Get-ADDomain
Get-ADForest
8. demote the old domain controller and then remove the old DC from domain. And then shut down the old DC
9. Change the new DC IP address to the Old one. Then run below command to make sure all DNS records are updated and also no error.
ipconfig/registerdns
dcdiag /fix
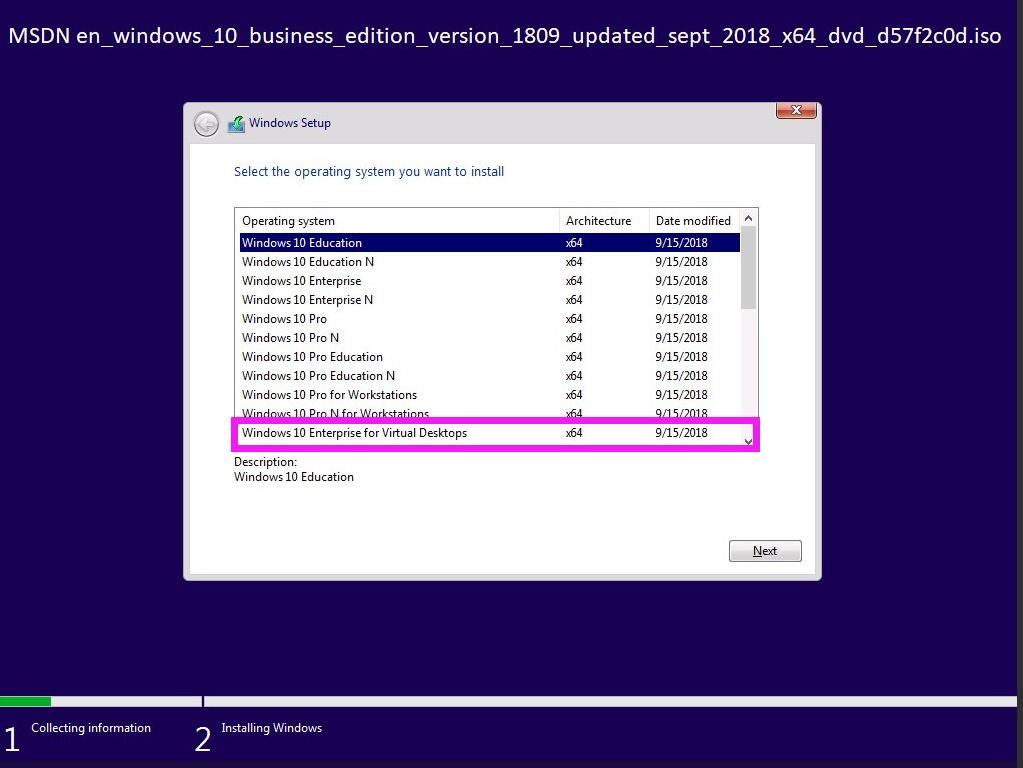
It seems for this version of Windows 10, multiple users can login at the same time.
I believe this version is the one used by Windows Virtual Desktop on Azure.
Microsoft released Office 2019 yesterday. But it seems Microsoft push very hard to get people move from traditional office to office 365.
After I login Microsoft Volume Licensing Service Center, I found that Microsoft stopped to provide the ISO for Office Professional Plus 2019. And Microsoft only provides the deployment tool to deploy office 2019.
Office Professional Plus 2019 will be released with Click-to-Run installation technology only. We are not providing MSI as a deployment methodology for Office Professional Plus 2019.
Ok, then how can we install Office Professional Plus 2019?
First of all, download Office_Deployment_Tools_2019_MLF_X21-88134.exe from Microsoft website.
Then create an xml file as following:
<Configuration>
  <Add OfficeClientEdition="64" Channel="PerpetualVL2019">
	<Product ID="ProPlus2019Volume" PIDKEY="#####-#####-#####-#####-#####" >
		<Language ID="en-us" />
		<ExcludeApp ID="Access" />
		<ExcludeApp ID="Publisher" />
		<ExcludeApp ID="Groove" />
		<ExcludeApp ID="Lync" />
		<ExcludeApp ID="OneDrive" />
	</Product>
  </Add>
</Configuration>
Please be aware “ProPlus2019Volume” is the only available channel for office 2019 “ProPlus2019Volume”.
3. Run below command to get office 2019 installed
setup /configure configuration.xml
And you can also download a copy of the installation files if you want via below command:
setup /download configuration.xml