Tag Archives: Linux

Citrix Error: The connection to *** failed with status 1030

In most situation, if you get this error, it means that there are some configuration errors in your Citrix environment. You can refer to below Citrix article for more information.

https://support.citrix.com/article/CTX124143

But, this week when we tried to renewal our netscaler certificate, we got a problem that:
1. Windows Machines works well with the new certificate. End users can start their VDIs with out any problem;
2. Windows Thin client which is running Windows Embedded XP can’t start VDI. They always got the error code’1030′
3. Some Linux thin client users can start their VDI, while some of them can’t. For who can’t start their VDI they got an error message said that S’SSL error’

Finally, after two days investigation, we fixed this issue.

1. Use Symantec SSL toolbox to scan the certificate installed on our server. We found below error message
SSL

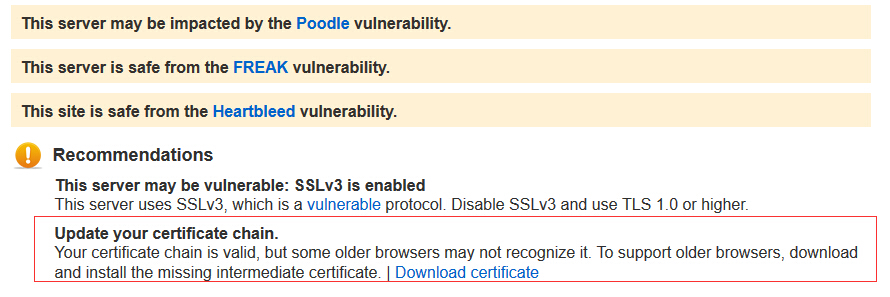
It means that for some old client, they may get problem without the chain. So download the chain and put it into the certificate on Netscaler.

2. After we fixed the chain issue, our thin client still can’t connect. And we found that for the thin client which is running Citrix Receiver 13.1, it can connect. And then we checked Citrix Receiver version changelog and we found

New features in this release

    Native Smartcard authentication to StoreFront
    Session Reliability for robust HDX connection
    SHA-2 encryption for enhanced security
    Improved 64-bit packaging to enable access from 64-bit Linux distributions


https://www.citrix.com/downloads/citrix-receiver/linux/receiver-for-linux-131.html

Well, that’s the key point. For thin client have, they are still using citrix online plugin 11.2 or Citrix Receiver 13.0 for Linux.
So we changed our certificate to SHA1, and all works.

The next step is to upgrade Citrix Receiver to the latest version on all Thin Client and then deprecation SHA-1 certificate and moving to SHA-2.

VMware Workstation 10&gtk2 Errors on RHEL

When executing the vmware workstation bundle, the following gtk2 errors are displayed:

# ./VMware-Workstation-Full-10.0.4-2249910.x86_64.bundle 
Extracting VMware Installer...done.
Gtk-Message: Failed to load module "pk-gtk-module": libpk-gtk-module.so: cannot open shared object file: No such file or directory
Gtk-Message: Failed to load module "canberra-gtk-module": libcanberra-gtk-module.so: cannot open shared object file: No such file or directory

Fix:

# echo "/usr/lib64/gtk-2.0/modules" > /etc/ld.so.conf.d/gtk2.conf
# ldconfig

gentoo fix bash vulnerability (bash shellshock) CVE-2014-7169

All Bash 3.1 users should upgrade to the latest version:

# emerge --sync
# emerge --ask --oneshot --verbose ">=app-shells/bash-3.1_p18-r1"

All Bash 3.2 users should upgrade to the latest version:

# emerge --sync
# emerge --ask --oneshot --verbose ">=app-shells/bash-3.2_p52-r1"

All Bash 4.0 users should upgrade to the latest version:

# emerge --sync
# emerge --ask --oneshot --verbose ">=app-shells/bash-4.0_p39-r1"

All Bash 4.1 users should upgrade to the latest version:

# emerge --sync
# emerge --ask --oneshot --verbose ">=app-shells/bash-4.1_p12-r1"

All Bash 4.2 users should upgrade to the latest version:

# emerge --sync
# emerge --ask --oneshot --verbose ">=app-shells/bash-4.2_p48-r1" 

Before you can run VMware Workstation, several pre-built modules must be compiled and loaded into the running kernel.

You’ll get this error when you upgrade your linux kernel after you installed VMware workstation.
To fix this issue, the easiest way is to re-install VMware workstation.
For RHEL, just using below command to uninstall VMware and install source kernel.

vmware-installer --uninstall-product vmware-workstation
yum install kernel-devel Kernel-headers

And then install VMware workstation

Preventing Brute Force Attacks With BlockHosts On Debian Etch

cd
wget http://www.aczoom.com/tools/blockhosts/BlockHosts-2.1.0.tar.gz
tar xvfz BlockHosts-2.1.0.tar.gz
cd cd BlockHosts-2.1.0
python setup.py install –force
nano /etc/blockhosts.cfg

修改

[…]
HOSTS_BLOCKFILE = "/etc/hosts.allow"
[…]
HOST_BLOCKLINE = ["ALL: ", " : deny"]
[…]
LOGFILES = [ "/var/log/auth.log", "/var/log/proftpd/proftpd.log", ]
[…]
COUNT_THRESHOLD = 3
[…]
AGE_THRESHOLD = 12
[…]
MAIL = True
[…]
NOTIFY_ADDRESS = [email protected]
[…]
SMTP_SERVER = "localhost"
SENDER_ADDRESS = ‘BlockHosts <[email protected]>’
[…]
IPBLOCK = "iptables" […]

In HOSTS_BLOCKFILE we can specify either /etc/hosts.allow or /etc/hosts.deny. It doesn’t matter which one we choose. I’m using /etc/hosts.allow here. In the LOGFILES line we specify the log files that BlockHosts should look at. OpenSSH is logging failed login attempts to /var/log/auth.log, ProFTPd to /var/log/proftpd/proftpd.log. COUNT_THRESHOLD specifies the number of failed login attempts from the same host after which BlockHosts should block that host. AGE_THRESHOLD is the numer of hours after which blocked hosts get unblocked. IPBLOCK specifies if you’d like to block hosts with iptables or iproute in addition to adding these hosts to /etc/hosts.allow (or /etc/hosts.deny).

Next we must modify /etc/hosts.allow. First back up your current /etc/hosts.allow:

cp /etc/hosts.allow /etc/hosts.allow_bak
nano /etc/hosts.allow

Continue reading